Christmas Goodies!

A plate of Christmas Party snacks, presided over by a cute modeling chocolate mouse.

Halloween Cauldron Cake

Sculpted tentacles and eyeballs in a cauldron of white chocolate.

Mother's Day Cake

Lovely hummingbird and lillies keylime cake for Mother's Day.

Christmas Cookies!

Royal icing sugar cookies and gingerbread cookies for Christmas!

Wednesday, October 14, 2015

Chocolate Covered Strawberry Cupcakes

These cupcakes were made in a hurry. I had to put these together in two hours with the help of a four year old. !)

My niece was the cutest thing! Dipping the strawberries, helping to pipe the strawberry cream frosting, and of course, helping to "clean" the bowls and spoons...

By the time these cupcakes were finished, it was time for them to be eaten. When all was said and done, I had few of these left, and all the pretty ones had gone. I snapped this picture of the best one that was left.


The flavoring I used in the ganache filling was called Tequila Rose, it was the only strawberry creme liqueur available at my local ABC store. I wasn't sure how the "splash of tequila" in it would affect the flavor, but I was pleasantly surprised. It added a lovely, complex flavor when combined with the bittersweet chocolate. I usually let ganache refrigerate overnight, but this time I made it first, then, after dipping all the strawberries, when the cupcakes were (not quite) cooled, I pulled it out of the fridge and was surprised to see how well set it was.

These cupcakes are delicious, quite possibly my new favorite.

Chocolate Covered Strawberry Cupcakes

One-Bowl Chocolate Cupcakes

2 1/2 cups flour
3/4 cup cocoa powder
2 cups sugar
1/2 tsp salt
2 tsp baking soda
1 tsp baking powder

3 eggs
1 cup milk
1/2 cup sour cream, light is fine, but don't use fat-free
3/4 cup canola oil
2 tsp vanilla extract

Preheat oven to 350F.

Line 24 cupcake pan cavities with paper liners.

Combine all dry ingredients in a mixing bowl and whisk vigorously until the mixture looks fluffy. This is to incorporate air for a fluffier cake.

Add the remaining ingredients to the bowl and whisk until incorporated. The consistency of the batter should be just thin enough to fall from the whisk in a ribbon. If it's too thick, add a little bit of milk to the batter. If it's too thin, add a little flour.

Bake cupcakes 16-18 minutes.

Cook cakes just until it springs back when gently pressed.

24 chocolate covered strawberries

Whipped Strawberry Ganache Filling

6 oz. by weight, dark chocolate, chopped
6 fluid oz. heavy cream
1 tsp strawberry cream liqueur or strawberry extract.

Add chocolate and cream to a small glass mixing bowl, microwave 1 minute and stir. If nessecary, microwave an additional 30 seconds, until chocolate melts into the cream when you stir. Once the chocolate is blended into the cream completely, add the strawberry cream liqueur or extract and stir thoroughly. Refrigerate until completely set, overnight, or at least two hours.

Core the cupcakes.

Take the ganache out of the refrigerator, and blend with a hand mixer until almost doubled in volume and lightened in color.

Transfer the ganache to a pastry bag and pipe into the cored cupcakes until a little bit over full.

Whipped Strawberry Cream Cheese Frosting

16 oz. cream cheese, cold
4 Tbs butter, softened
1/4 cup strawberry jam
1/2 tsp lemon extract
1 tsp vanilla extract
1/2 - 2 cups confectioners' sugar, to taste

1 cup heavy cream, cold
2 Tbs - 1/2 cup confectioners' sugar to taste

Combine the first six ingredients in a food processor, and pulse until combined

Add the cream and sugar to a stand mixer with whisk attachment, whip until it holds firm peaks.

Fold the cream cheese mixture into the whipped cream mixture.

Whip with the whisk attachment until smooth.

Fill a pastry bag with a Wilton 1M or other desired piping tip, and pipe generously onto the filled cupcakes.

Drizzle with melted chocolate and top with a chocolate covered strawberry.

Saturday, September 12, 2015

Carrot Cake Cupcakes with Perfectly Pipeable Cream Cheese Frosting

When it comes to cake, carrot is one of my favorite flavors. It has been since I was a kid. I make it at least once a year for my Grandmother's birthday. I've played with the recipe a lot over the years, from purist nothing-but-carrots carrot cake to everything-but-the-kitchen-sink carrot cake. One constant, however, has been the frosting. It has to be cream cheese frosting. I love the flavour of cream cheese frosting and how well it pairs with carrot cake. But the consistency of cream cheese frosting has always been a little disappointing to me as a decorator, and as a lover of fluffy, voluminous frostings.


This year, I experimented with the frosting, rather than the cake. This time, I think I've arrived at the perfect, pipeable, cream-cheesy frosting that I will use from now on. Just look at the fluffy peak of not-too-sweet, cheese-cakey goodness on that cupcake! To marry the flavours of the cake and frosting, I glazed the cupcakes with golden syrup and added 2 tablespoons of golden syrup to the frosting. That gives everything a sort of caramel undertone which goes very well with the carrot cake.

On to the recipes!

Carrot Cake

2 cups unbleached flour
2 cups granulated raw sugar
1 tsp salt
2 tsp baking soda

3/4 cup canola oil
3/4 cup milk
3 eggs
2 tsp vanilla extract
1/4 tsp almond extract

2 cups shredded carrots (2 medium carrots)
1 8 oz. can crushed pineapple, drained
2/3 cup shredded coconut
1 cup chopped pecans

golden syrup (as needed)

Preheat the oven to 350F.
Line 24 cupcake cavities with paper liners.
-OR-
Spray 2 9 inch round cake pans with baking spray and line the bottoms of the pans with parchment paper.

In a large mixing bowl, whisk the dry ingredients together until the flour is aerated.
Add the wet ingredients to the dry and whisk until combined.
Fold in the carrots, pineapple, coconut, and pecans.

Distribute the batter evenly between the pans, and bake.

Bake cupcakes 16-18 minutes.
-OR-
Bake cakes 25-35 minutes.

Bake cake only until it springs back when pressed lightly.

Place cakes on a cooling rack.
Drizzle a little golden syrup over the cakes while warm, and spread with a pastry brush.
Cool the cakes completely.

Whipped Cream Cheese Frosting

16 oz. cream cheese, cold, full fat works best, but can work with 1/3 fat (neufchatel). Please do NOT use fat free! :#
3 Tbs butter, softened
1/3 cup granulated (not coarse) raw sugar
2/3 cup confectioners' sugar

1 cup heavy whipping cream
1/4 cup confectioners' sugar
2 Tbs golden syrup

In a food processor, combine the cream cheese and butter until coarsely combined, add the sugar and process until just smooth, but still firm.

Place the whipping cream in the bowl of a stand mixer with whisk attachment, add the sugar and syrup and whip on high until a bit stiffer than you would want whipped cream, it should hold firm peaks.

Fold the cream cheese into the whipped cream using a stiff spatula. Use the stand mixer to whip the mixture until fully combined and fluffy, about 1 minute.

It's important to keep this frosting cold, so I popped it into the fridge while I prepared the piping bag. I usually use a 12 inch disposable pastry bag with a Wilton 1M tip for cupcakes.

Scoop 1/3 of the frosting into the pastry bag, and put the bowl back in the fridge.
Pipe pretty swirls on 8 cupcakes, and repeat until there are no more cupcakes and just enough frosting for a post-baking treat. !)

Keep the cupcakes refrigerated until about 10 minutes before serving. They should be fine for about 2 hours without refrigeration, but I think they're best when chilled.

Wednesday, September 2, 2015

Kitty's Very Best Pecan Pie

My family loves pecan pie. Halloween, Thanksgiving, Christmas--and something pretty close on Derby Day (if you're from Kentucky, you'll know what I mean !) ). But, if you're like me, you like the idea of pecan pie. I love pecans. It seems like I should love a pie made from them. The reality, however, is a pecan-flavoured goo that's so sweet it makes your teeth hurt. I tend to choose another dessert on occasions when pecan pie is served.

But today, today I made a pecan pie for myself. One that I believed I would like, throwing family recipes and traditions to the wind! And it was glorious! A pie that is firm enough to hold its shape, with toasty, nutty, caramelly flavour running through it, enhancing, not overwhelming the flavor of the pecans. I love this pie.

The secret to this pie is golden syrup. It's not as overwhelmingly sweet as the cornsyrup traditionally used in pecan pie, and lends its own incredible flavour to the pie. It tastes like caramel. I also used raw sugar, which adds its own not-just-sweet flavour, a little like brown sugar, but different. You could sub light brown sugar, if you don't have raw sugar on hand. I also snuck in a little Kahlua. I'm used to pecan pie tasting like Bourbon. I don't like that. I prefer the richness of the coffee liqueur over the straight booziness of Bourbon. If you like that flavor, though, go for it! Dark rum also works very nicely.

You might have trouble finding golden syrup locally, I did. I ordered mine from Amazon here. It's almost 6 bucks a bottle, and this pie takes almost the entire thing, but it's soooo worth it.

Two other unusual things you might want to get if you bake a lot of pies are a digital kitchen scale with a tare function, I got mine for 5 bucks on eBay, and a deep tart pan (this is the one I got). You don't need a tart pan, an ordinary pie plate will work but it does make cutting and serving so much easier, and you can make such lovely, deep pies in it. I also enjoy displaying freestanding pies on cake plates. :D

Without further ado, on to the recipe!


Toast 11 oz. (by weight) of pecans in a cast iron skillet with 2 Tbs butter. Use these pecans in the following recipes.

Pecan Pastry:
3 oz. (by weight) toasted pecans, ground
1 1/2 cups flour
1/4 tsp salt
6 Tbs butter, cold, cut into pieces
3 Tbs water
1 Tbs coffee liqueur, bourbon, or rum

In a food processor, pulse the pecans until finely ground.
Add the flour and salt, pulse to combine.
Add the cold butter all at once, and pulse until coarsely combined.
Add the water and liqueur and process until the mixture forms a soft dough.
Turn the dough out onto a sheet of plastic wrap.
If the dough is sticky, work in a little more flour.
Shape dough into a disc, and place in the refrigerator until needed.

Filling:
3 eggs
4 Tbs butter, melted and slightly cooled
2/3 cup raw, or light brown, sugar
8 oz. (by weight, est. 2/3 cup) golden syrup
1 Tbs coffee liqueur, bourbon, or rum
1 tsp vanilla extract
1/4 tsp salt
6 oz. (by weight) chopped toasted pecans
2 oz. (by weight) toasted pecan halves

Preheat the oven to 375F.
Roll out the pastry to about 15" and place into you 10"x2" tart pan. If desired you can use excess pastry dough to make decorations for the top of the pie. I used a Wilton silicone mold to make the decoration for my pie. Freeze any pastry decorations while you make the filling.

Whisk together the eggs and butter until smooth.
Add the sugar, syrup, liqueur, vanilla, and salt, and whisk to combine.

Sprinkle the chopped pecans over the bottom of the prepared crust.
Pour the egg mixture over the pecans.
Place your pie in the bottom third of your oven and bake for 20 minutes.
The filling should look somewhat puffed, and be thickened enough for your decorations to sit on top.
Add the reserved 2 oz. of whole pecan halves in a ring around the outer edge of the pie. Also, pull any pastry decorations you may have made out of the freezer and place them where desired.

Reduce the heat to 350F, and bake an additional 15-20 minutes.

When the pie is done, the filling should look puffy, and a skewer inserted into the middle of the pie should come out clean.

Cool your pie in the pan, on a cooling rack. The filling will fall as it cools.
If you used a tart pan, set the pie on a large can or heavy glass, and pull the pan edge ring down and away from the pie. Slide the pie off onto your serving plate.
Eat with icecream!

Monday, July 13, 2015

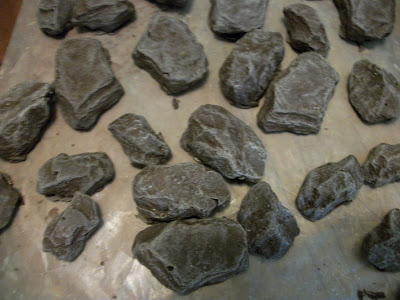
Rock Cupcakes

When I made the wolf cake, I also needed some cupcakes to go with it. I made mossy rock cupcakes to match the wolf cake. In this post, I'll show you how I made the chocolate rocks.


First off, find yourself some interesting rocks out in the garden, that are a good size to sit on your cupcakes. Also, find a good size container for your rocks. They'll need about 1/4" of space between each one. Wash the rocks very, very well, and dry them off with paper towels. Grease your container and rocks with shortening. If your rocks aren't completely flat on the bottom (what rocks are, really?) fill in the gaps with shortening and place them in the bottom of your container. One you've got all your rocks positioned in your container, it's time to make the mold material.


Now, if you've ever made a mold before, you'll know that all the materials you can get for it, especially food safe materials like ComposiMold or silicone, can be very expensive. But it doesn't have to be a spendy project. Here is a recipe for an inexpensive, reusable, food safe mold...

Gelatine and light corn syrup (liquid glucose if you're in EU), with a little water. Yep, that's all. The amounts are roughly equal parts gelatine and corn syrup with just enough water to hydrate the gelatine. The amounts don't have to be exact, I usually just eyeball it.

Put your gelatine in a microwave safe bowl. Add enough water to the bowl to hydrate the gelatine, that'll be about 1/3 cup of water to each cup of gelatine. Slowly work the gelatine into the water. If necessary, you can add more water. Let the gelatine absorb the water for a few minutes.


Pop the mixture into the microwave for 10 seconds and stir. If the gelatine hasn't melted at all, microwave it for another 10 seconds. It should look relaxed, if not melty.


At this point, add the corn syrup. Heat and stir gently at 10 second intervals until the gelatine is completely melted, it will be very sticky.


You can add white (and color) food coloring to it if desired. I find it makes it easier to see imperfections in the mold if it's opaque. Plus, it doesn't hurt anything for it to look prettier. !)

If it has started to solidify while you were adding the food coloring, just nuke it for an additional 10 seconds.

While the mixture is hot, pour it over your rocks in the container. Slam it on the table a few times to release any air bubbles that might be trapped in the mold. Then pop it in the freezer for about 5 minutes or until the mold is completely set.

The bowl will look like a terrible, sticky mess that will never come clean. Just let the material set up completely, and you will be able to pull it off the bowl very easily.

If you mess up your first mold, don't sweat it. Did you notice I called the material "reusable"? Well, if the mold doesn't come out. You can remelt it in the microwave and try it again. In fact, the container I chose at first was too big for the amount of material I made, so I clipped out the two rock molds that came out, and melted the rest. I found a smaller container and redid the mold.


Once your mold is set, turn it out onto the table, pop the rocks out, and wash the mold in cool water. Dry the mold completely.


Melt your chocolate, and pour it into the molds! I set mine up in the freezer, because I was under some time pressure.

To make the chocolate rocks look a little more natural, I used a large paintbrush and dusted them with white petal dust. Drag the brush across the angles to accentuate the details.


Your rocks are done!


Store your molds in the refrigerator or freezer to prolong their life.


Happy Caking!

3D Wolf Cake

Hello!

On Thursday, I made a wolf cake for my cousin's Birthday to try out some new techniques. It was my first time making a "gravity defying" cake with an armature, so I thought documenting the process might help others interested in making this kind of cake. !)


I am also a 3D graphic artist, so the way I drafted the plans for my armature were, perhaps unorthodox.

I sculpted a rough wolf model in ZBrush.


Added some boxes where the support boards would be (body and legs).


Then performed an intersection boolean operation on them.


After that, I just arranged the pieces so that they were all on the floor and took a screenshot from above.


If all those steps sound like gobbledegook, just sketch out your plan with a good ol' pencil on paper. Just make sure that all the legs that touch the ground are the same length, so that the cake board will be level.

I also used an image of the profile of the wolf as a reference for carving.

Here are the final images for the plans:


I printed them at 72 dpi for a cake about 16 inches long from nose to bum. You can print them at any size depending on your cake size needs. :)

Cut out the shapes and tape them together wherever necessary.

I was so focused on building the armature, that I forgot to take pictures. You'll need basic woodworking skills for this part of the project. You'll also need a jigsaw and a drill with an apropriate drill bit for drilling pilot holes, as well as a 1/2" board large enough to cut your pieces and display board out of, screws and a screwdriver. I used 1 1/4" wood screws.

I traced the shapes onto 1/2" melamine shelving board. The kind I used was about 15" wide and 30" long, it was $13 from Lowes, and I used about half of it.

Cut out the shapes with a jigsaw.

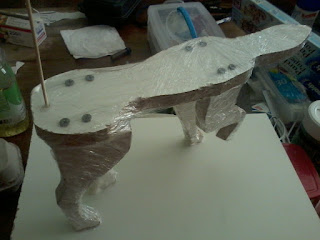
Position the legs where they should be on the bottom of the body support board. Trace the top of the leg with a pencil onto the bottom of the body support board. Mark where the screws should go. I put two in each leg. Use a ruler to mark corresponding drill marks on each of the legs. If you don't want to use screws, it may be possible to use hot glue instead, but it will not be quite as sturdy. If you are making a larger cake than the one shown here, I would not reccomend it. A smaller one would be fine.

Drill your pilot holes where you have marked them. Drill all the way through the body support board and about 1/2" into the legs.

Put your screws into the holes from the top of the body support board. I prefer to drive them with a regular screwdriver to avoid splitting the board, however, you can use a driver bit in your drill if you prefer. Once the screws are poking through to the bottom of the body support board, add the legs, one at a time making sure that the pilot holes in the legs are aligned with the screws. Hold the leg firmly while you drive the screws into it.

Once all your legs are attached, position your wolf on the display board and trace all three feet onto the board. Position pilot holes carefully so that the screws will go into the verticle part of the leg rather than right through the foot. I put screws only into the back two feet, and reinforced with hot glue. I also glued down the front foot with hot glue.

Cut four small blocks out of the scrap shelving board. Use hot glue to affix them on the bottom of the display board to create "feet." If you plan to use a turn table for decorating, make sure the feet are positioned so that they fit around the outside edge of the turntable plate.

Your armature is now complete!

Because plywood, particle board, and press board can contain harmful substances, make sure you cover the entire armature with a double or triple thickness of plastic wrap. Wrap it TIGHT! If the plastic wrap sags, it can cause problems when you start sculpting your cake. If you want to be super sure it won't sag, you can use double-sided tape, or brush some glue, melted marshmallow, or corn syrup over the surface before applying the plastic wrap.


Now that your armature is securely wrapped in plastic, make a nice fresh batch of rice crispy treats. Since my whole cake was chocolate/peanutbutter flavour, I made mine with cocoa krispies and peanutbutter in place of butter.

Melt some extra marshmallows with a little bit of water. I used four regular-sized marshmallows and about 1/2 teaspoon of water. Use a spatula to spread the marshmallow goo over the plastic wrap on all the surfaces of the armature except the top of the body support board. I had to use my small offset spatula to get into the narrow places between the leg boards.


Use the rice krispy treats to fill in the chest, neck, thigh, and shoulder areas.


Torte one 9"×13" cake. Leave the two layers stacked. Mark out intervals of about 3 1/2" along the short sides of the cake cut the cake along the marks so that you wind up with three long strips of cake, two 3 1/2" wide and one 2" wide.

Spread a thin layer of ganache over the top of the support board.

The board is longer than 13" so you will need to stack and fill the 3 1/2" wide cake layers toward the back end of the support board. Cut the extra 2" strip of cake into wedge shapes for the head. Stack and fill the head and glue it to the body with more ganache.


Refrigerate until the ganache is firm.

Now it's the fun part! It's time to carve the cake. Use your reference image to carve by and have fun. Make sure you don't stress over it too much. If you over-carve, you can always fill it back in. To fill in an anemic part of the cake, just take some of your cake carving scraps, preferably the scraps that have a bit of ganache in them, and squish it between your fingers until it turns into a cake pop like consistency. Press it into the area to bulk it up. I used this technique to round out the haunches and shoulders.


Crumb coat the cake. I like to get a nice even layer of ganache on the cake (and over the rice krispy treats), then, I just cover the whole thing with plastic wrap and use the plastic wrap to smooth and shape the ganache. Much easier than trying to smooth it with a spatula. Refrigerate until the ganache is really firm. If the ganache is too soft, it will pull off with the plastic wrap and make a big mess.


I spaced a little on this next step as well... Covering the cake.

I used a 2:1 MMF/modelling chocolate mix to cover the cake. The mix dries out much more slowly than straight up fondant, and tastes better, too. :)

Instead of covering the whole cake with one big sheet of fondant, I covered it in stages, to create a more layered, furry look. I started with the back legs, then the haunches with the tail attached, then the torso, the front legs, the shoulders, the neck, and finally, the head. The next time I make a cake like this, I'll remember to document the process of covering the cake. O:)

I used Elisa Strauss' fur impression mats to do the texture on the fondant, and I did the finer sculpting details using "Color Shapers." Color shapers are my new favourite sculpting tools. I've seen them reccomended on various blogs and in several tutorials and classes lately. I was a little skeptical as to how much more useful they would be than the usual sculpting tools I had, so I wasn't prepared to spend a lot on them. I bought this set from Amazon.com. They really are the shiz. I love them! They saved time, they blended seams easily, and they were awesome for sculpting details. I love the range of sizes that came in the set I got.


Then, came my first airbrushing experience. I got an inexpensive airbrush from harbor freight, along with some couplers to allow me to attach it to my regular 6 gallon air compressor, and a set of Americolor airbrush colors. I only used two colors, black and chocolate brown, thinned with vodka. I didn't have time to clean the airbrush between colors. I sprayed black, then brown, didn't have any trouble.


After airbrushing, I painted some additional detail on the face using my gel colors and paint brushes. The cake was done! I was quite pleased with it.

All that's left is the cake board. I've got some 1" wide ribbon that I glued around the edge of the board to create a bit of a lip. I crumbled up what was left of the scrap from carving the cake and pressed it lightly onto the board. It makes pretty convincing "dirt." To add a little more realism, I sprinkled some graham cracker crumbs that I'd dyed green around the board for moss, and chocolate rocks.